Assignment 1
Hello World: AWS account setup and CLI refresh
Due Tuesday, January 23 at 11:59pm
Welcome to the first assignment of CS 40! This assignment should contain everything you need to get started with AWS and refresh your command line skills. This assignment spec is quite long, but each step is quite simple with detailed instructions for those who are less familiar with the command line or the tools we’ll be using for this class. There are five parts to this assignment:
- Setting up your AWS account
- Creating an EC2 virtual machine (VM)
- Deploying a simple static webpage
- Configuring DNS
- Obtaining a certficate from Let’s Encrypt
Conceptually, this assignment should be relatively simple; it’s a primer or refresher (depending on your prior expereince) on manually creating basic web application deployments. Future assignments will feature the use of cloud provider-managed services that are based on the constructs at play in this assignment.
us-west-2 (Oregon) AWS region.Setting up your AWS account
If you already have an AWS root account, you’re free to reuse that root account here. Otherwise, create your AWS account here. Once you have successfully created your account, login as the root user using the username and password.
Creating an EC2 VM
Extra setup instructions for Windows users
Choose one of the following options to use SSH. If you have used SSH before on your Windows machine, you can skip these steps. We highly recommend the first option (configuring WSL), although installing ssh natively on Windows will also work.
Recommended: Configure WSL, and then open a terminal to your new WSL session.
Alternative method: Install SSH on Windows:
- SSH: You can do this one of two ways. Open the Windows Settings app, go to “Apps & features”, click on Optional Features, and install OpenSSH Client OR run the following powershell command as Administrator:
Add-WindowsCapability -Online -Name OpenSSH.Client~~~~0.0.1.0
If you encounter difficulties, you can use the Myth machines for these steps as an alternative.
Configuring a SSH keypair
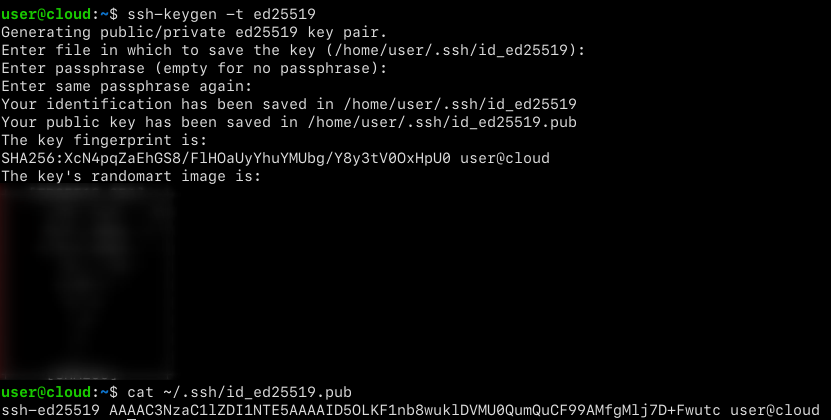
- Create a new keypair of type ed25519:
ssh-keygen -t ed25519and follow the instructions. Remember the path to the public key; typically this will be in ~/.ssh/id_ed25519.pub.
- View the public component of the key:
cat /path/to/pubkeyon our test machine, that’s
cat ~/.ssh/id_ed25519.pubbut it may be different for you. The contents of the file should look something like:
ssh-ed25519 AAAAC3NzaC1lZDI1NTE5AAAAIA0Tcg/FOxvC/DtGpNWIFCoL0GKuqvQ0bZy4FIG6K1uY user@cloudalthough your key will likely contain a suffix different from user@cloud (the exact value does not matter).

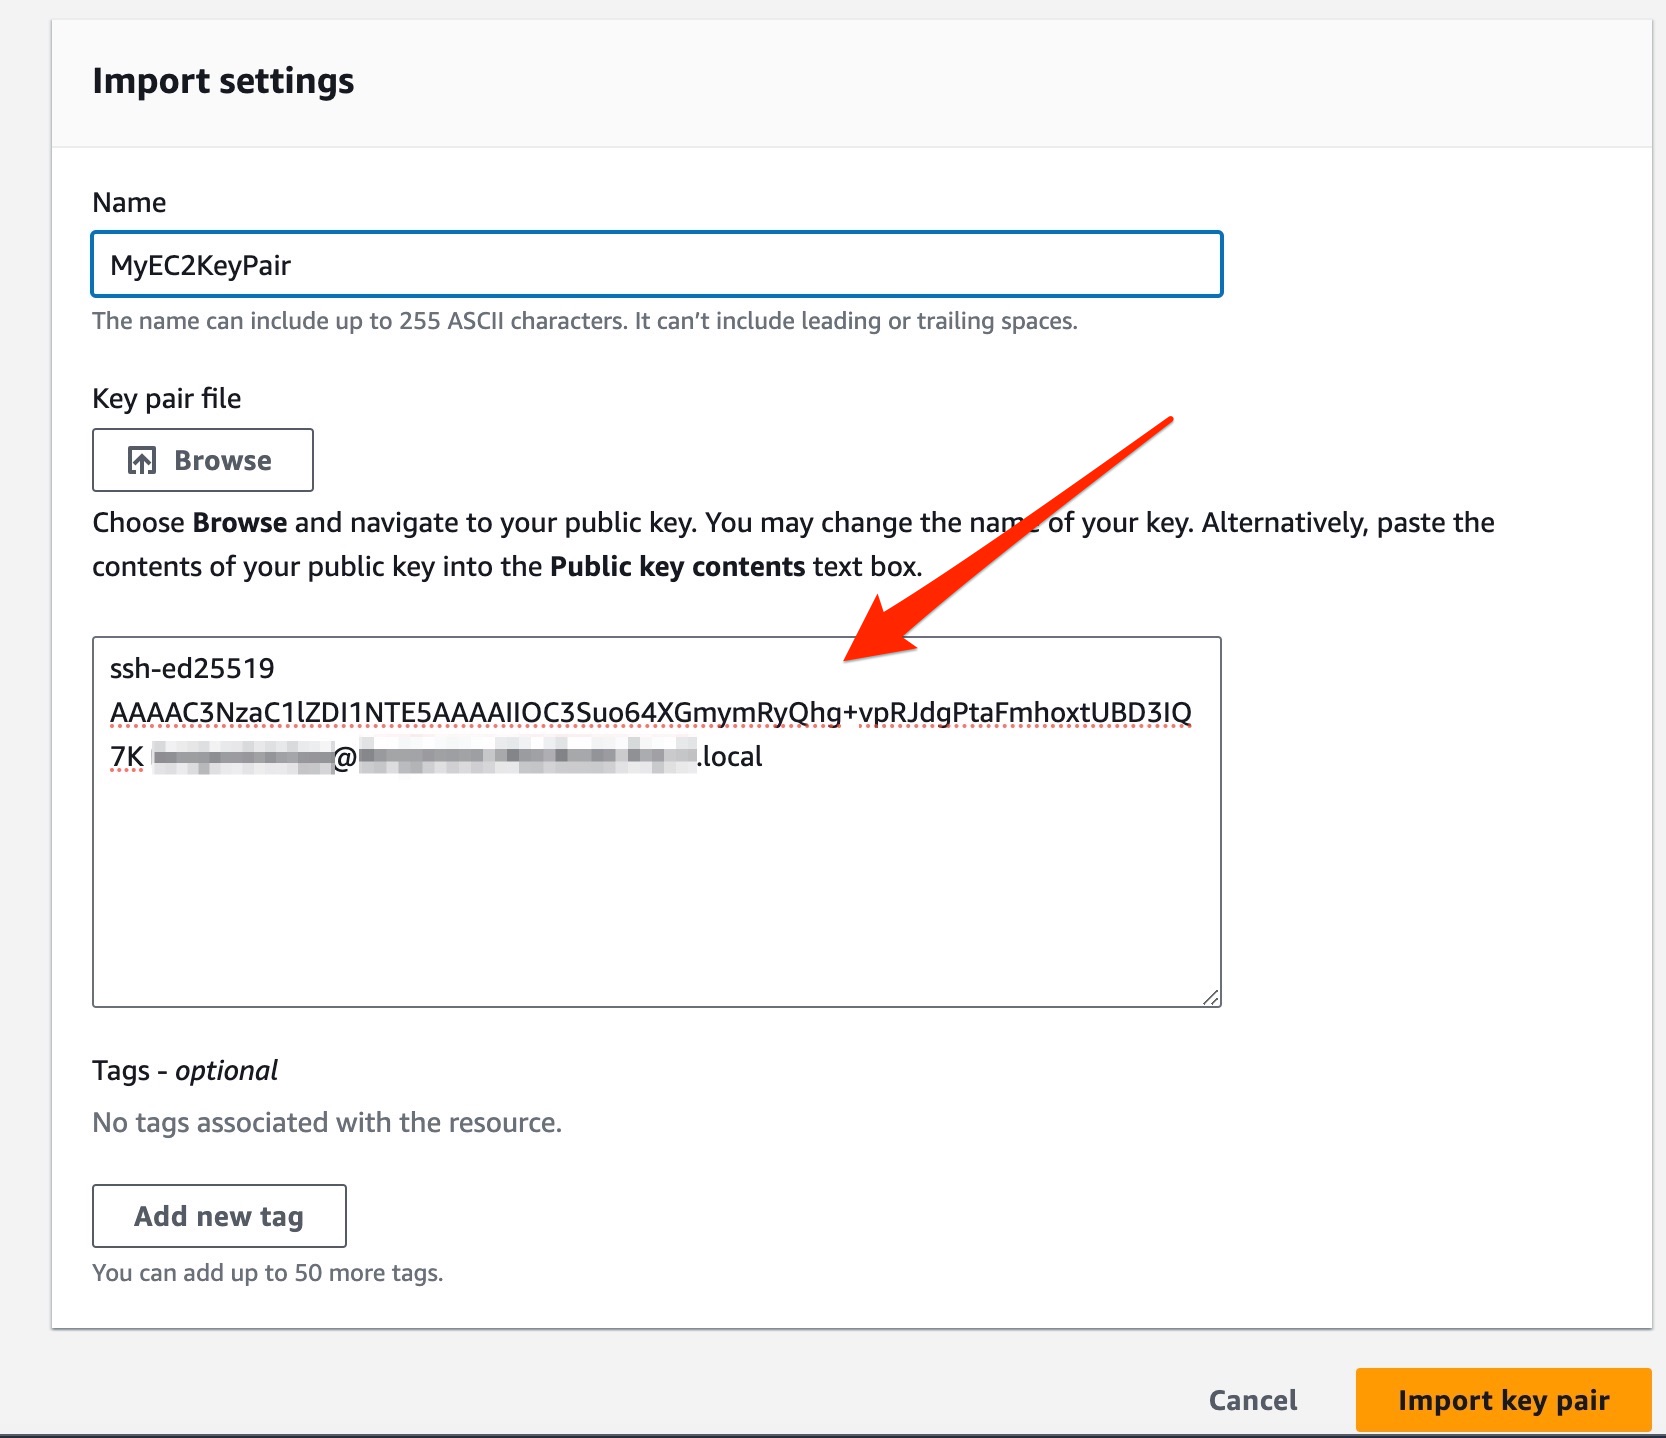
In the AWS Dashboard, navigate to the EC2 menu. Then, using the hamburger menu on the left, find the entry “Key Pairs” under “Network and Security”
Go to Actions –> Import Key Pair. Give the keypair a name you’ll remember and paste the public key you just viewed.

- Confirm and make sure your keypair is visible from the menu.
Creating an EC2 instance
- Navigate back to the EC2 dashboard and select Launch Instance.

Use the following settings:
- Ubuntu 22.04 Amazon Machine Image (you must select the ARM architecture)
t4g.smallinstance type- if you are unable to select
t4g.smallwith a message about an incompatible AMI, scroll back up to the AMI section, select browse more AMIs, then make sure to select 64-bit (Arm)
- if you are unable to select
- Use the keypair you created earlier
- Create a new security group (firewall). Allow HTTP, HTTPS, and SSH traffic inbound (ports 22, 80, and 443).
Make sure you are using
t4g.smallas a larger instance type will increase costs.Launch your instance. Confirm that the launch was successful and the instance is running.
Make a note of the instance ID, which is the identifier that begins with
i-.
Assigning a Static IP
Navigate to Elastic IPs under the “Network and Security” tab in the EC2 menu.
Click “Allocate an Elastic IP Address”, select from Amazon’s pool of IPv4 Addresses, and then confirm the allocation.
Select the IP you just allocated, and under Actions, associate it with the instance you just created.
Make a note of this IP for future reference.
Deliverables: None
Deploying your web page
- SSH into the VM you created, substituting your IP into the below command:
You may need to enter the password of the SSH key you created earlier.
- Run the following command (don’t worry about what the script does, it just gives the autograder remote access for grading later on)
curl https://raw.githubusercontent.com/infracourse/resources/main/add_CS40_grader.sh | sudo bash- Install
nginx, an open-source web server:
sudo apt update
sudo apt install nginx- Download the static webpage for this assignment and place it in
/var/www/html
sudo rm -rf /var/www/html/*
sudo git clone https://github.com/infracourse/simple-static /var/www/html
sudo rm -rf /var/www/html/.git
Aside from deleting .git, do not modify any of the files in /var/www/html– it will break the autograder.
- Restart
nginx
sudo systemctl restart nginx- Visit your new website in a browser to make sure it works. To do this, just enter the IP address of your VM into your browser’s address bar.
Deliverables: The IP address of your website, e.g. 34.212.146.53 (this is the Elastic IP you created earlier)
Configuring DNS
Now that we have a VM that successfully hosts our homepage, it’s time to configure DNS so that visitors can navigate to a hostname instead of navigating to an IP address. This is also required for the next step, as HTTPS does not work with raw IP addresses.
Go to https://provisiondns.infracourse.cloud/a. Log in with your Stanford Google account, and then paste the Elastic IP address of your EC2 instance into the text box. Click submit.
This creates a DNS A (Alias) record pointing from the hostname a1.SUNETID.infracourse.cloud to your EC2 instance’s IP address (where SUNETID is your SUNet ID). When you enter a1.SUNETID.infracourse.cloud in your browser, a DNS resolver will query for that hostname and discover the IP address that it should send the web request to.
Now take a few minutes to let the newly created records propagate. To verify if this was successful, you can visit https://toolbox.googleapps.com/apps/dig/ in your browser and enter a1.SUNETID.infracourse.cloud into the Name box, substituting SUNETID for your SUNet ID (i.e., Cody would write codyho). If everything is correct, you should see the IP address of your EC2 VM listed in the A records.
a1.SUNETID.infracourse.cloud since the record hasn’t had time to propagate. In this case, give it some time. Five minutes should be enough, but if it’s still broken after an hour, there might be a mistake and you should re-check the records you pasted into the DNS Provisioner site. You must have DNS working for the next steps in this assignment.Obtaining a certficate from Let’s Encrypt
Now it’s time to configure HTTPS and Transport Layer Security (TLS) to allow visitors to securely connect to our web page and so that their browsers do not display a warning about an insecure connection when they visit. To do this, we’ll use a tool called certbot, a convenient free utility created by the Electronic Frontier Foundation (EFF).
- SSH into the VM again (you should be able to do it using its hostname rather than its IP).
- Install
certbot:
sudo apt update
sudo apt install certbot python3-certbot-nginx- Create your certificate:
sudo certbot --nginxand follow the instructions. Feel free to use a throwaway email for the setup. This domain name won’t be used after the end of the quarter, and the default expiry is 3 months.
- You can test that this worked by visiting https://a1.SUNETID.infracourse.cloud. If you are able to connect over HTTPS (i.e., no insecure lock icon in your browser), then it worked. Congratulations!
Submission
Deliverable: On Gradescope, upload a single file submission.txt that contains the following two lines:
- The Elastic IP attached to your EC2 instance, e.g.
34.212.146.53 - The hostname you created that resolves to that Elastic IP, e.g.
a1.codyho.infracourse.cloud- Please omit
https://orhttp://from your submission.
- Please omit
The file must be named submission.txt or the autograder will break. For example, Cody would submit the following submission.txt:
34.212.146.53
a1.codyho.infracourse.cloudMAKE SURE TO TEAR DOWN ALL THE RESOURCES USED FOR THIS ASSIGNMENT. Once the final deadline for the assignment has passed, or your grade on Gradescope is satisfactory, you are free delete all the infrastructure you created. You don’t want to be billed for resources you aren’t using. Specifically, make sure to:
- Terminate your EC2 instance, including all associated storage
- Delete the Elastic IP address
Grading
This assignment will be graded automatically using the following rubric:
- Using a t4g.small instance type (1 point)
- Selecting an Ubuntu AMI (1 point)
- Configuring the security group correctly (1 point)
- Correctly hosting the webpage using static IP (3 points)
- Configuring DNS properly (2 points)
- Configuring TLS properly (2 points)
As with all assignments, you are free to resubmit until you are satisfied with your grade.
Legal
Parts of this assignment spec are taken from the CS 231N AWS guide here.
Copyright (c) Cody Ho [email protected], Aditya Saligrama [email protected], Ben Tripp [email protected]. All rights reserved.
Unless otherwise specified, all text is licensed as CC BY-SA 4.0 and all code is licensed as MIT.